ESXi
An additional step-by-step guide can be found here which also details the ESXi installation process: https://clo.ng/blog/detectionlab-on-esxi/
Prereqs (~30-60 minutes)
- Have an ESXi instance version 6 or higher. VSphere is NOT required.
- Terraform version 0.13 or higher is required as it provides support for installing Terraform providers directly from the Terraform Registry.
- The ESXi Terraform Provider built by https://github.com/josenk/terraform-provider-esxi is required, but will be installed automatically during a later step.
- Your ESXi instance must have at least two separate networks - one that is accessible from your current machine and has internet connectivity and a HostOnly network to allow the VMs to communicate over a private network. The network that provides DHCP and internet connectivity must also be reachable from the host that is running Terraform - ensure your firewall is configured to allow this.
- OVFTool must be installed and in your path.
- On MacOS, I solved this by creating a symbolic link to the ovftool included in VMWare Fusion:
sudo ln -s "/Applications/VMware Fusion.app/Contents/Library/VMware OVF Tool/ovftool" "/usr/local/bin/ovftool" - On Silicon Macs, OVFtool is not included in VMWare Fusion Tech Preview, so you’ll have to use the download link below and symlink via
sudo ln -s /Applications/VMware\ OVF\ Tool/ovftool /usr/local/bin/ovftool - Downloads for OVFTool are also here: https://code.vmware.com/web/tool/4.4.0/ovf
- On MacOS, I solved this by creating a symbolic link to the ovftool included in VMWare Fusion:
- On your ESXi instance, you must:
- Enable SSH
- Enable the “Guest IP Hack”
- Open VNC ports on the firewall (not reqired for ESXi 7.0+)
- Instructions for those steps are here: https://nickcharlton.net/posts/using-packer-esxi-6.html
- Alternatively, you can install the VIB file from https://github.com/sukster/ESXi-Packer-VNC which will automatically open the VNC ports on the ESXi firewall.
- Install Ansible and pywinrm via
pip3 install ansible pywinrm --useror by creating and using a virtual environment. - Packer v1.7.0+ must be installed and in your PATH
- sshpass must be installed to allow Ansible to use password login. On MacOS, install via
brew install hudochenkov/sshpass/sshpassasbrew install sshpassdoes not allow it to be installed.
Steps
- (5 Minutes) Edit the variables in
DetectionLab/ESXi/Packer/variables.jsonto match your ESXi configuration. Theesxi_network_with_dhcp_and_internetvariable refers to any ESXi network that will be able to provide DHCP and internet access to the VM while it’s being built in Packer. This is usually VM Network.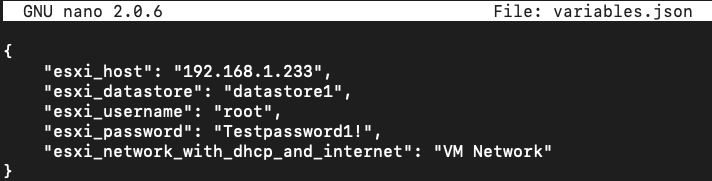
Special Configuration for ESXi 6.x
If you’re using ESXi 6.x (as opposed to 7.x), remove the following two directives from builders array:
- “vnc_over_websocket”: true,
- “insecure_connection”: true,
{
  "builders": [
    {
      "vnc_over_websocket": true,    <---- Remove
      "insecure_connection": true,   <---- Remove
      "vnc_disable_password": true,
      "keep_registered": true,
...
to each of the following files:
- DetectionLab/ESXi/Packer/windows_10_esxi.json
- DetectionLab/ESXi/Packer/windows_2016_esxi.json
- DetectionLab/ESXi/Packer/ubuntu2004_esxi.json
The remaining steps on this page apply to both both ESXi 6.x and 7.x:
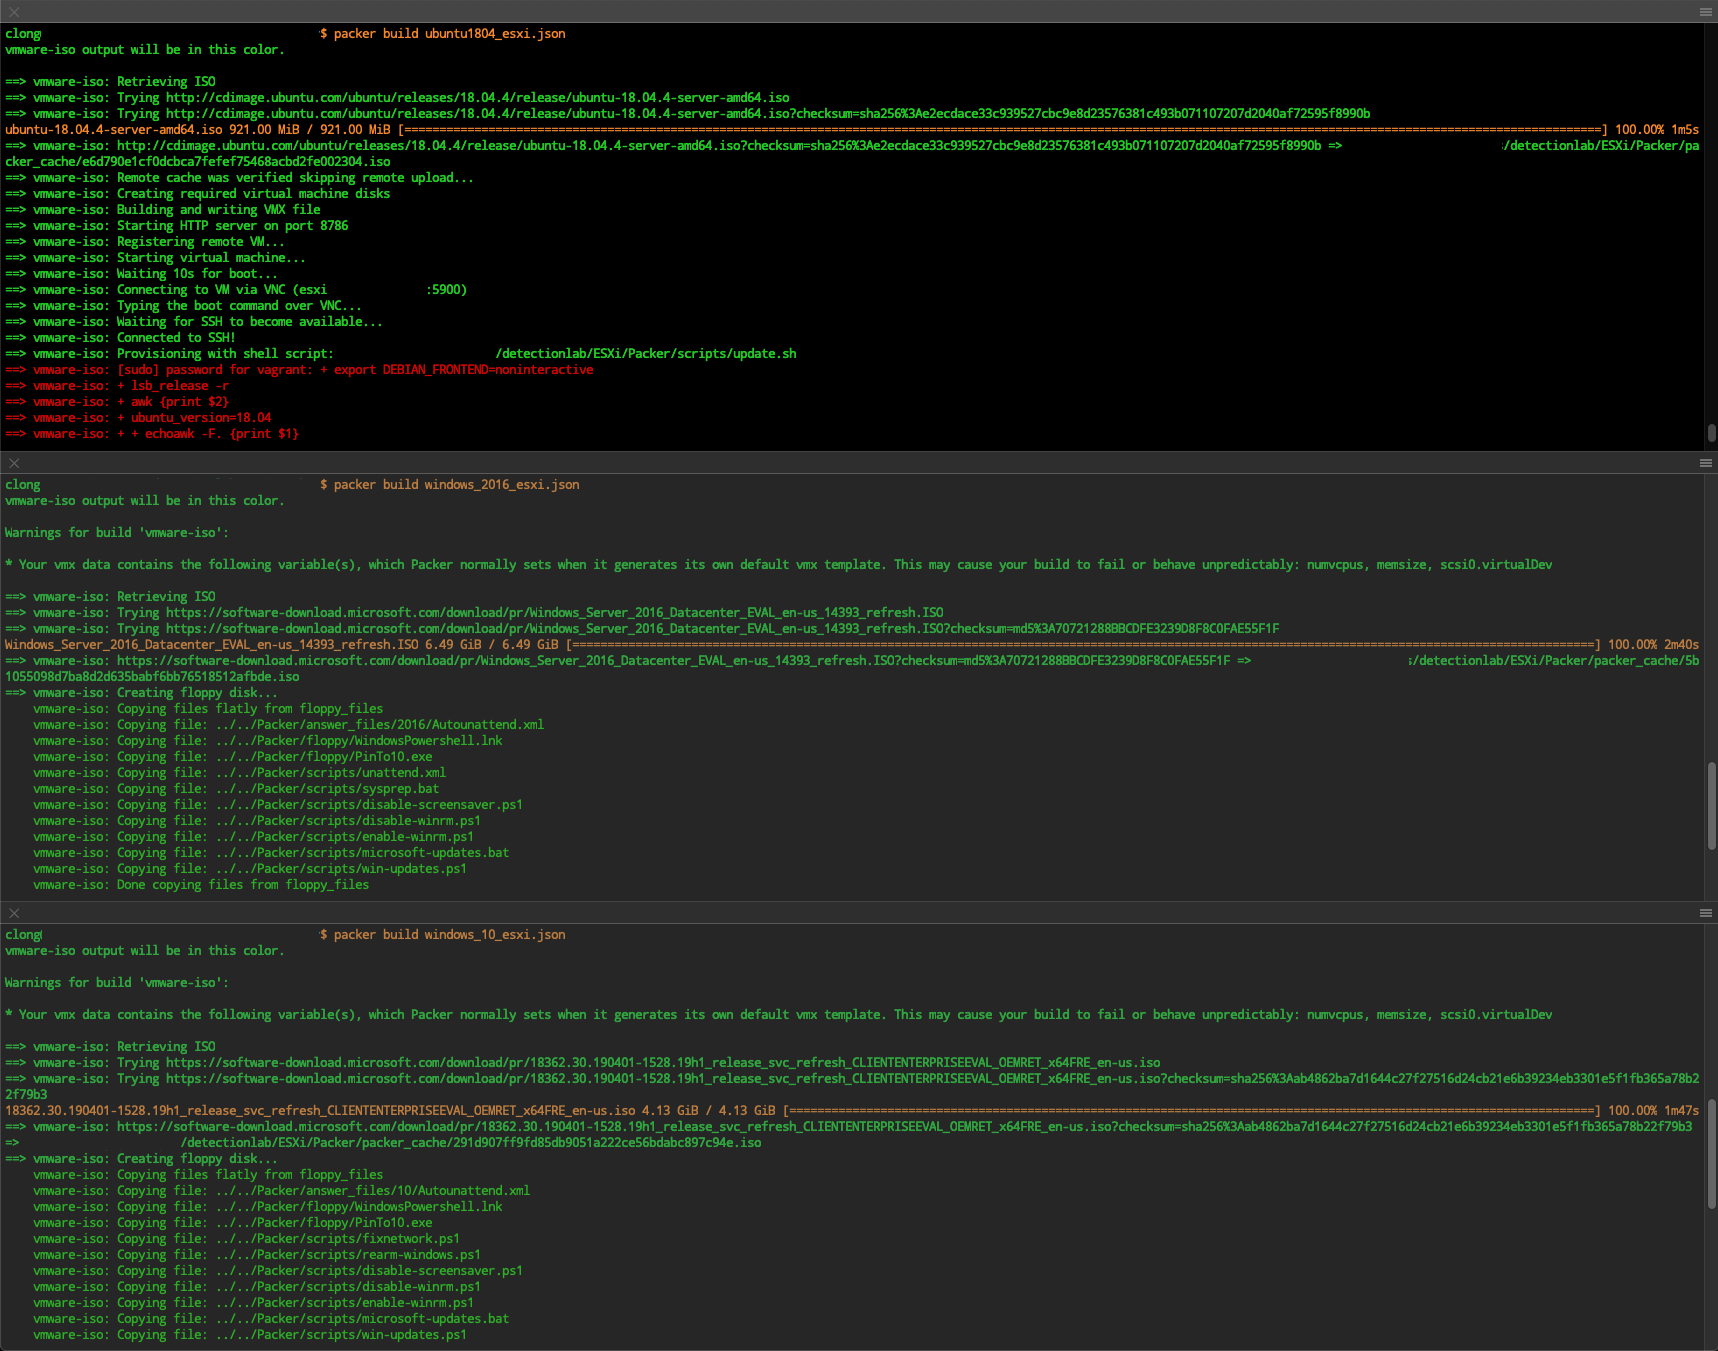
- (45 Minutes) From the
DetectionLab/ESXi/Packerdirectory, run:
PACKER_CACHE_DIR=../../Packer/packer_cache packer build -var-file variables.json windows_10_esxi.jsonPACKER_CACHE_DIR=../../Packer/packer_cache packer build -var-file variables.json windows_2016_esxi.jsonPACKER_CACHE_DIR=../../Packer/packer_cache packer build -var-file variables.json ubuntu2004_esxi.json
These commands can be run in parallel from three separate terminal sessions.
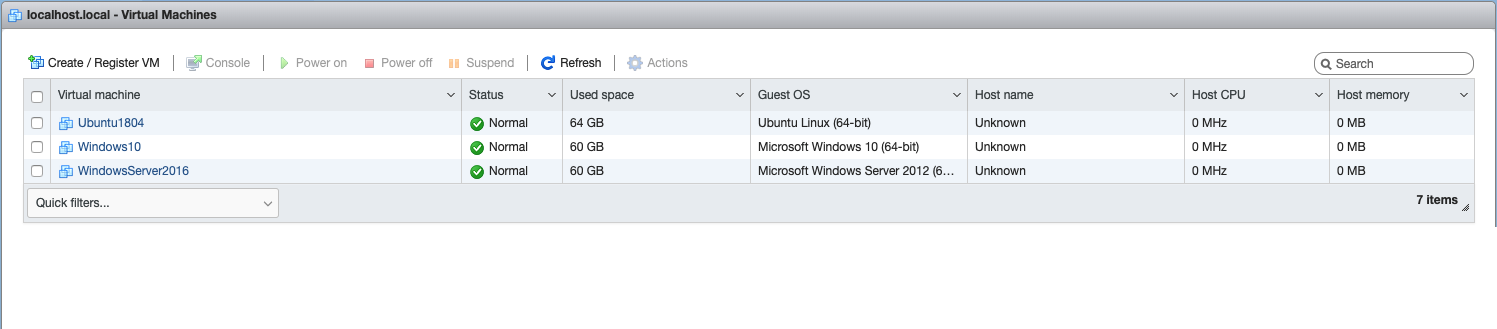
-
(1 Minute) Once the Packer builds finish, verify that you now see Windows10, WindowsServer2016, and Ubuntu2004 in your ESXi console
-
(5 Minutes) In
DetectionLab/ESXi, Create a terraform.tfvars file (RECOMMENDED) to override the default variables listed in variables.tf.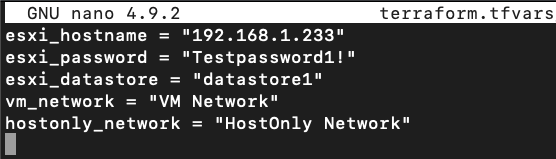
-
(25 Minutes) From
DetectionLab/ESXi, runterraform init. The ESXi Terraform provider should install automatically during this step:
$ terraform init

Initializing the backend...

Initializing provider plugins...
- Finding josenk/esxi versions matching "1.8.0"...
- Installing josenk/esxi v1.8.0...
- Installed josenk/esxi v1.8.0 (self-signed, key ID A3C2BB2C490C3920)

Partner and community providers are signed by their developers.
If you'd like to know more about provider signing, you can read about it here:
https://www.terraform.io/docs/plugins/signing.html

Terraform has been successfully initialized!
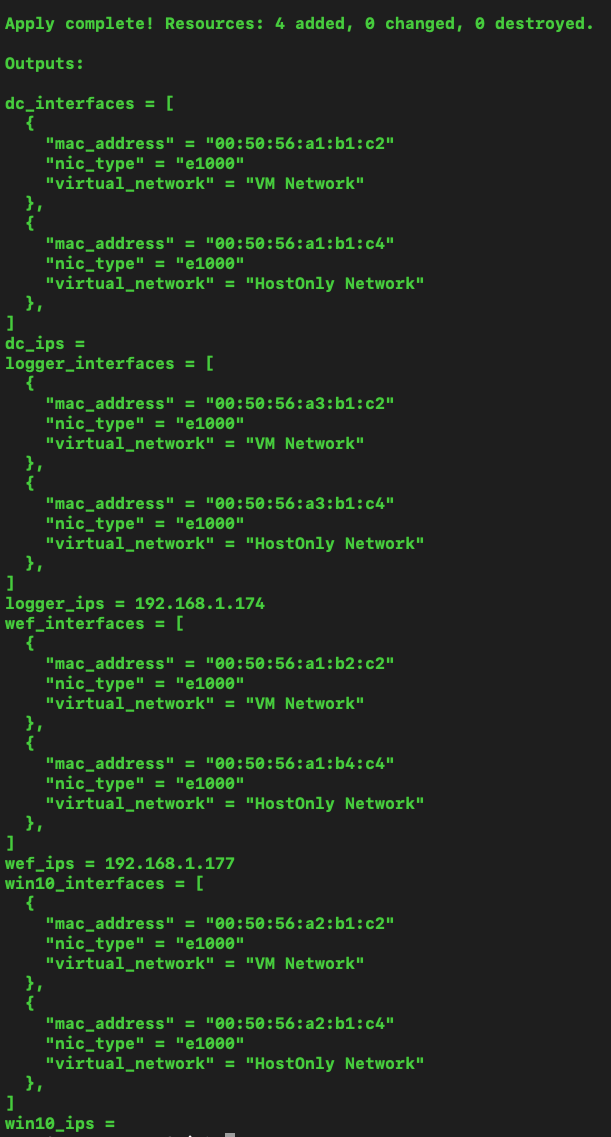
- Running terraform apply should then prompt us to create the logger, dc, wef, and win10 instances:
$ terraform apply
<snip>
Plan: 4 to add, 0 to change, 0 to destroy.

Do you want to perform these actions?
  Terraform will perform the actions described above.
  Only 'yes' will be accepted to approve.
If an ESXi server is managed by a vCenter, terraform will fail with: Access to resource settings on the host is restricted to the server that is managing it: xx.xx.xx. To allow terraform to work, a user can SSH into the ESXi server and run:
/etc/init.d/vpxa stop; /etc/init.d/hostd restart
This will disconnect the host from the vCenter. Once the terrafrom is complete, run /etc/init.d/vpxa start to reconnect with the vCenter server.
Once finished, you should see something like the following:
- Once Terraform has finished bringing the hosts online, change your directory to
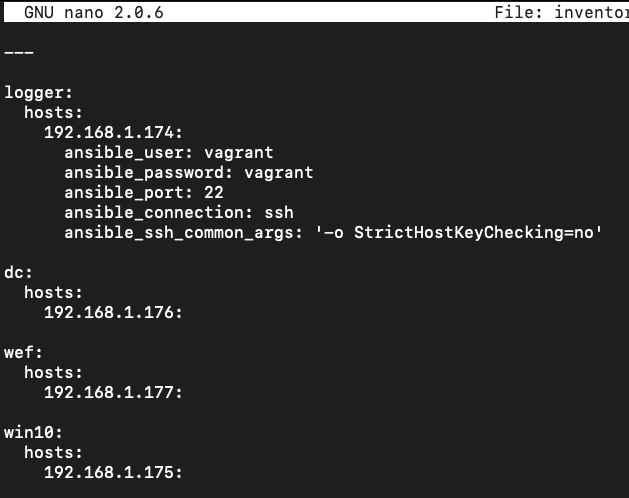
DetectionLab/ESXi/Ansible - (1 Minute) Edit
DetectionLab/ESXi/Ansible/inventory.ymland replace the IP Addresses with the respective IP Addresses of your ESXi VMs. At times, the Terraform output is unable to derive the IP address of hosts, so you may have to log into the ESXi console to find that information and then enter the IP addresses intoinventory.yml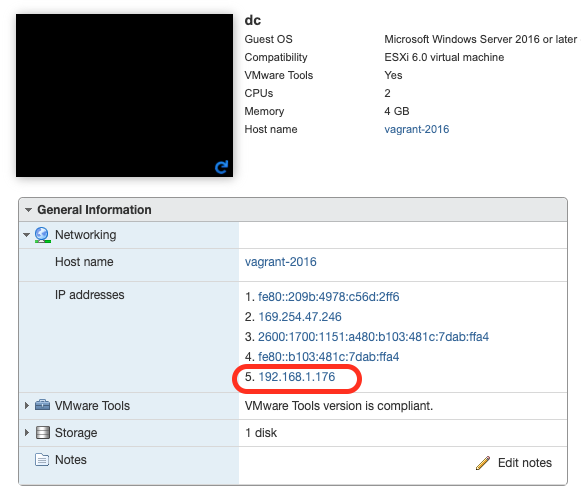
- (3 Minute) Before running any Ansible playbooks, I highly recommend taking snapshots of all your VMs! If anything goes wrong with provisioning, you can simply restore the snapshot and easily debug the issue.
- (30 Minutes) Run
ansible-playbook -v detectionlab.yml. This will provision the hosts one by one using Ansible. If you’d like to provision each host individually in parallel, you can use ansible-playbook -v detectionlab.yml –tags “[logger|dc|wef|win10]” and run each in a separate terminal tab.If running Ansible causes a
fork()related error message, set the following environment variable before running Ansible:export OBJC_DISABLE_INITIALIZE_FORK_SAFETY=YES. More about this here.. - If all goes well, you should see the following and your lab is complete!

If you run into any issues along the way, please open an issue on Github and I’ll do my best to find a solution.
Configuring Windows 10 with WSL as a Provisioning Host
Note: Run the following commands as a root user or with sudo
- In Windows 10 install WSL (version 1 or 2)
- Install Ubuntu 18.04 app from the Microsoft Store
- Update repositories and upgrade the distro: apt update && upgrade
- Ensure you will install the most recent Ansible version: apt-add-repository –yes –update ppa:ansible/ansible
- Install the following packages: apt install python python-pip ansible unzip sshpass libffi-dev libssl-dev
- Install PyWinRM using: pip install pywinrm
- Install Terraform and Packer by downloading the 64-bit Linux binaries and moving them to /usr/local/bin
- Install VMWare OVF tool by downloading 64-bit Linux binary from my.vmware.com and running it with “–eulas-agreed” option
- Download the Linux binary for the Terraform ESXi Provider from https://github.com/josenk/terraform-provider-esxi/releases and move it to /usr/local/bin
- From “DetectionLab/ESXi/ansible” directory, run: “ansible –version” and ensure that the config file used is “DetectionLab/ESXi/ansible/ansible.cfg”. If not, implement the Ansible “world-writtable directory” fix by going to running: “chmod o-w .” from “DetectionLab/ESXi/ansible” directory.
Future work required
- It probably makes sense to abstract all of the logic in
logger_bootstrap.shinto individual Ansible tasks - There’s a lot of areas to make reliability improvements
- I’m guessing there’s a way to parallelize some of this execution: https://medium.com/developer-space/parallel-playbook-execution-in-ansible-30799ccda4e0
Debugging / Troubleshooting
- If an Ansible playbook fails, you can pick up where it left off with
ansible-playbook -v detectionlab.yml --tags="<hostname>" --start-at-task="taskname"
Credits
As usual, this work is based off the heavy lifting that others have done. My primary sources for this work were:
- Josenk’s Terraform-ESXI-Provider - Without this, there would be no way to deploy DL to ESXi without paying for VSphere. Send him/her some love 💌
- Automate Windows VM Creation and Configuration in vSphere Using Packer, Terraform and Ansible - Dmitry Teslya
- Building Virtual Machines with Packer on ESXi 6 - Nick Charlton
- The DetectionLab work that juju4 has been doing on Azure and Ansible
- lofi hip hop radio - beats to relax/study to 🔉
Thank you to all of the sponsors who made this possible!