Linux: Virtualbox & VMware
Supported Provisioners
- Virtualbox
- A licensed copy of VMware Fusion
- The VMWare Desktop Vagrant plugin
- Install it with
vagrant plugin install vagrant-vmware-desktop. - Additionally, the Vagrant VMware Utility must also be installed
If you have both Virtualbox and VMware installed, consider disabling the network adapters for the provider that you are not using. For example, if you want to build DetectionLab using Virtualbox, disable the VMware network adatpers (or vice-versa) to avoid a conflict.
Instructions
- Ensure the prerequisites listed above are installed and that you meet the system requirements
- Clone the DetectionLab repo to your filesystem:
git clone https://github.com/clong/DetectionLab.git - Using a terminal, navigate to the DetectionLab/Vagrant repository and run ./prepare.sh to verify that your system has all of the prerequisites installed:
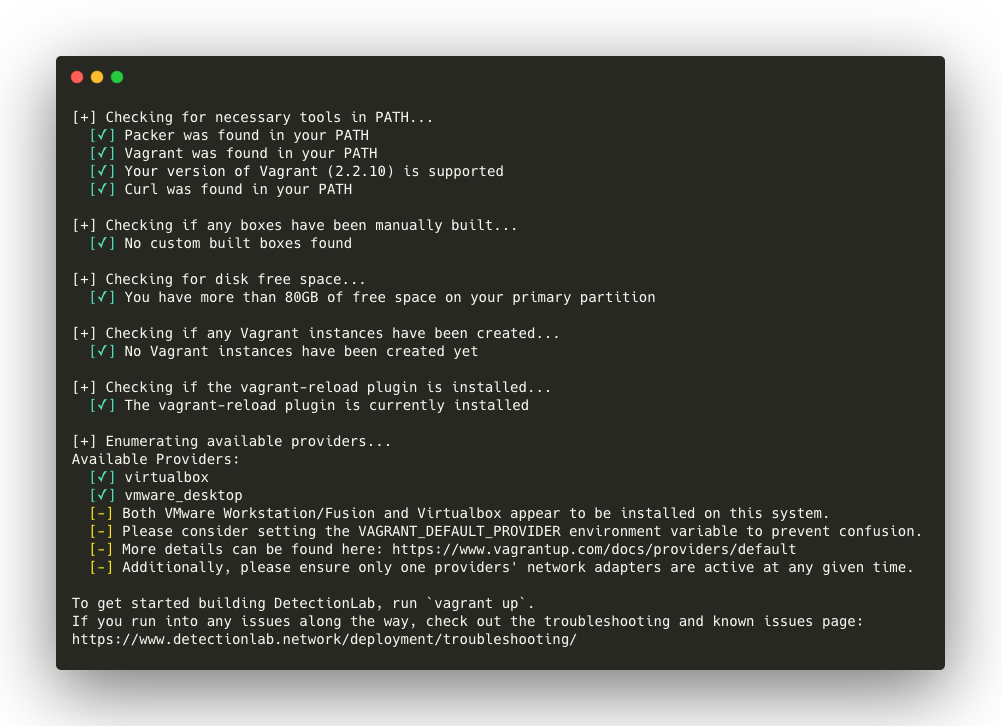
At this point in time, there are two ways to bring up DetectionLab. We can bring up the hosts one at a time using vagrant up --provider=<provider> command. The provider options are virtualbox or vmware_desktop. However, there is also a faster way explained below.
Speed Up Installation by Provisioning Hosts in Parallel
Alertatively, to speed up the provisioning process, we can bring up some hosts in parallel. To do this, I recommend opening 4 separate terminal windows open to the DetectionLab/Vagrant directory. In terminal windows 1 and 2, you can run vagrant up logger and vagrant up dc at the same time. Before we can bring up wef and win10, we have to wait for the dc host to finish creating the domain. Once it has passed that step of the provisioning process, you can run vagrant up wef and vagrant up win10 in terminal windows 3 and 4 at the same time.
You shouldn’t need to sudo any of the vagrant commands. Doing so can cause permission issues down the road.
When we run Vagrant up, here’s what happens:
- Vagrant will bring up one host at a time, starting with logger and followed by dc, wef, and win10.
- Three boxes will be downloaded from Vagrant cloud:
- Each box will go through provisioning, which configures the host and installs software.
After running vagrant up --provider=vmware_desktop or vagrant up --provider=virtualbox, you should see something like this:
$ vagrant up --provider=vmware_desktop
Bringing machine 'logger' up with 'vmware_desktop' provider...
Bringing machine 'dc' up with 'vmware_desktop' provider...
Bringing machine 'wef' up with 'vmware_desktop' provider...
Bringing machine 'win10' up with 'vmware_desktop' provider...
==> logger: Cloning VMware VM: 'bento/ubuntu-18.04'. This can take some time...
==> logger: Checking if box 'bento/ubuntu-18.04' version '202005.21.0' is up to date...
==> logger: Verifying vmnet devices are healthy...
==> logger: Preparing network adapters...
==> logger: Fixed port collision for 22 => 2222. Now on port 2206.
==> logger: Starting the VMware VM...
==> logger: Waiting for the VM to receive an address...
==> logger: Forwarding ports...
    logger: -- 22 => 2206
==> logger: Waiting for machine to boot. This may take a few minutes...
    logger: SSH address: 127.0.0.1:2206
    logger: SSH username: vagrant
    logger: SSH auth method: private key
    logger: Warning: Connection reset. Retrying...
    logger: Warning: Remote connection disconnect. Retrying...
    logger:
    logger: Vagrant insecure key detected. Vagrant will automatically replace
    logger: this with a newly generated keypair for better security.
    logger:
    logger: Inserting generated public key within guest...
    logger: Removing insecure key from the guest if it's present...
    logger: Key inserted! Disconnecting and reconnecting using new SSH key...
==> logger: Machine booted and ready!
==> logger: Setting hostname...
==> logger: Configuring network adapters within the VM...
==> logger: Waiting for HGFS to become available...
==> logger: Enabling and configuring shared folders...
    logger: -- /DetectionLab/Vagrant: /vagrant
==> logger: Running provisioner: shell...
    logger: Running: /var/folders/7h/3s_x3_p500z48z381k82ffgh0000gn/T/vagrant-shell20200813-58692-1fm4ylc.sh
    logger: [05:14:29]: Adding apt repositories...
    logger: Get:1 http://security.ubuntu.com/ubuntu bionic-security InRelease [88.7 kB]
    logger: Hit:2 http://archive.ubuntu.com/ubuntu bionic InRelease
...
...
If all goes well, this process should continue for 1-2 hours depending on your computer and network speed. The boxes are very large, but only need to be downloaded once.
[*] Verifying that Splunk is running and reachable...
  [✓] Fleet is running and reachable.

[*] Verifying that Fleet is running and reachable...
  [✓] Fleet is running and reachable.

[*] Verifying that the Velociraptor service is running and reachable...
  [✓] Velociraptor is running and reachable.

[*] Verifying that Guacamole is running and reachable...
  [✓] Guacamole is running and reachable.
If for some reason you encounter an error or any issues, checkout the troubleshooting page linked below. If you can’t find an answer to your question, please open an issue on the DetectionLab GitHub!
Troubleshooting
Visit the troubleshooting page.